During Scott Guthrie’s keynote at PDC09 (starting around 1:28:00), Scott Hanselman presented a demo that highlighted Visual Studio 2010, Silverlight 4, RIA Services, and lots of great new tooling that ties all of these products together. I wanted to show you how you can build the same application using installations that are available today.
Machine Setup
You’ll need to install Visual Studio 2010 Beta 2 if you haven't already. If you have a previous release of RIA Services already installed, you’ll need to uninstall it before proceeding. Please note that you want to keep the Silverlight 3 SDK installed though. While you can only have one Silverlight runtime installed, Visual Studio 2010 Beta 2 installs the Silverlight 3 SDK for you and it should remain installed side-by-side with the Silverlight 4 SDK.
When you go to http://silverlight.net/riaservices, you’ll be able to install the Silverlight 4 Tools for Visual Studio 2010. With one installer, you get everything you need to build Silverlight 4 and RIA Services applications with Visual Studio 2010 Beta 2!
Building the Solution
 From here, I’m going to assume that you have SQL 2008 Express installed on your machine. If you’re using SQL Standard or whatnot, please make the appropriate tweaks to the instructions.
Create a new solution using the “Silverlight Navigation Application” template. Call it ContosoSales and be sure to create a directory for the solution.
When prompted, choose to host the Silverlight application in a new web application project (the default settings), keep Silverlight 4 selected, and enable RIA Services.
<p>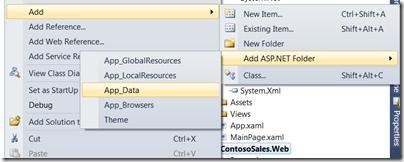 We’re going to add an existing database file, so we need to add the App_Data folder to the Web project. Once that folder is added, right-click on it and choose to add an existing item. You’ll want to grab ContosoSales_Data.mdf from the zip file posted here, and that’s what you will add into the App_Data folder.</p>
<p>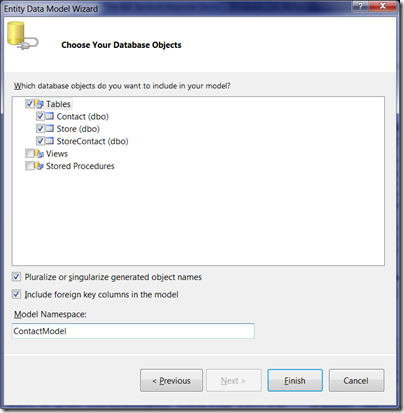 We can now create the Entity Framework model on top of our database. Add a new ADO.NET Entity Data Model (found under the Data tab), called ContactModel.edmx. Use the default settings to generate the model from the ContosoSales.mdf file. Then select the 3 tables from the database (Store, StoreContact, Contact). Change the model namespace to ContactModel.</p>
<p>At this point, you’ll need to build your solution. </p>
<p>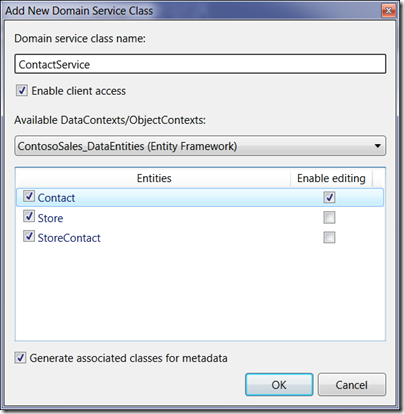 Now, we can add our Domain Service Class using the RIA Services Domain Service wizard (found under the Web tab). Name the class ContactService.cs.</p> <p>In the wizard, you’ll need to select all three of the entities and enable editing for Contact. We also want to turn on ‘Generate associated classes for metadata.’</p> <p>Note: During the keynote demo, we already had the metadata class in place so that we could have the attributes applied to it ahead of time, which is why we did this a little bit differently during the demo. Using this wizard, RIA Services will add the necessary references to your project and add some entries in your web.config to configure the service. You don’t have to use the wizard to create your Domain Service, but it helps get you going very quickly.</p> <p>We now want to edit the metadata for our entities. To keep things simple, we’ll use the single metadata file that was created from the wizard. Edit ContactService.metadata.cs to have the following:</p> <div id="codeSnippetWrapper"> <div style="border-bottom-style: none; text-align: left; padding-bottom: 0px; line-height: 12pt; border-right-style: none; background-color: #f4f4f4; padding-left: 0px; width: 100%; padding-right: 0px; font-family: 'Courier New', courier, monospace; direction: ltr; border-top-style: none; color: black; font-size: 8pt; border-left-style: none; overflow: visible; padding-top: 0px" id="codeSnippet"> <pre style="border-bottom-style: none; text-align: left; padding-bottom: 0px; line-height: 12pt; border-right-style: none; background-color: white; margin: 0em; padding-left: 0px; width: 100%; padding-right: 0px; font-family: 'Courier New', courier, monospace; direction: ltr; border-top-style: none; color: black; font-size: 8pt; border-left-style: none; overflow: visible; padding-top: 0px">using System.Collections.Generic;</pre>
using System.ComponentModel.DataAnnotations;
using System.Web.DomainServices;
namespace ContosoSales.Web
{
[MetadataTypeAttribute(typeof(Contact.ContactMetadata))]
public partial class Contact
{
internal sealed class ContactMetadata
{
public int ContactID { get; set; }
public string ContactPhoto { get; set; }
public IEnumerable<StoreContact> StoreContacts { get; set; }
[Required]
[StringLength(30, MinimumLength = 2)]
[Display(Name = "First Name")]
public string FirstName { get; set; }
[Required]
[StringLength(30, MinimumLength = 2)]
[Display(Name = "Last Name")]
public string LastName { get; set; }
[Required]
[Range(10, 1000000, ErrorMessage = "{0} must be between $10 and $1,000,000")]
[Display(Name = "Sales Target")]
public decimal SalesTarget { get; set; }
[Required]
[Display(Name = "Work Phone")]
public string WorkPhone { get; set; }
}
}
[MetadataTypeAttribute(typeof(Store.StoreMetadata))]
public partial class Store
{
internal sealed class StoreMetadata
{
public int StoreID { get; set; }
[Required]
public string City { get; set; }
[Required]
[Display(Name = "State/Province")]
public string StateProvince { get; set; }
[Display(Name = "Store Image")]
public string StoreImage { get; set; }
[Required]
[Display(Name = "Store Name")]
public string StoreName { get; set; }
[Include]
public IEnumerable<StoreContact> StoreContacts { get; set; }
}
}
[MetadataTypeAttribute(typeof(StoreContact.StoreContactMetadata))]
public partial class StoreContact
{
internal sealed class StoreContactMetadata
{
public int StoreID { get; set; }
public int ContactID { get; set; }
[Required]
public string Position { get; set; }
public Store Store { get; set; }
[Include]
public Contact Contact { get; set; }
}
}
}
</div> </div>
In this application, we actually only need to provide a single query for getting Stores, and a single update method for updating Contacts. The DomainService class can be trimmed down to the following:
using System.Data;
using System.Linq;
using System.Web.DomainServices.Providers;
using System.Web.Ria;
namespace ContosoSales.Web
{
[EnableClientAccess]
public class ContactService : LinqToEntitiesDomainService<ContosoSales_DataEntities>
{
public IQueryable<Store> GetStores()
{
return from store in this.ObjectContext.Stores.Include("StoreContacts").Include("StoreContacts.Contact")
where store.StateProvince == "CA"
orderby store.StoreName
select store;
}
public void UpdateContact(Contact currentContact)
{
if ((currentContact.EntityState == EntityState.Detached))
{
this.ObjectContext.AttachAsModified(currentContact, this.ChangeSet.GetOriginal(currentContact));
}
}
}
}
We’re finished creating the Domain Service now, so we can go ahead and build the solution. This will trigger the RIA Services code generation, ultimately allowing the Data Sources window to pick up our model.
We’re going to build the Silverlight application like most developers would, without the awesome styles provided by a designer. But at the end of this post, I’ll give you a link to get the fully styled version of the application.
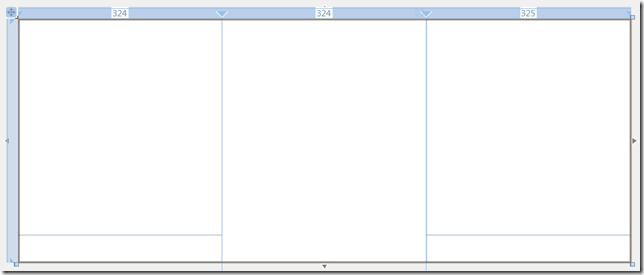
Open up Home.xaml; we’ll create our controls in there. During the demo, we used a Blank.xaml and a Contacts.xaml, but we’ll just stick with Home.xaml here to keep things simple. We want to resize the page, drop a few grids into place and get something that looks like this:
We now need to get to the Data Sources window. If it’s not already open, you can open it using Data->Show Data Sources menu option. It might take a few moments for your model to show up in the window, but you will end up seeing ContactContext with Store under it.
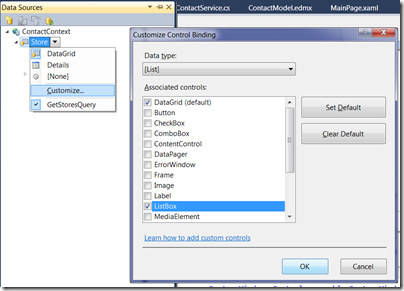 By default, ListBox doesn’t show up as an option for the Store list, but we can easily add it. Click the dropdown next to Store and choose “Customize…” Then turn on the checkbox for ListBox and click OK.
Now you can click the dropdown next to Store again and choose ListBox. This tells the Data Sources window that when you drag Store onto the design surface, it should create a new ListBox control. Go ahead and do this, dropping the ListBox into the upper-left cell in our grid. Once you have the ListBox positioned entirely within the appropriate grid cell, you’ll want to use the same right-click, Reset Layout->All gesture you saw during the keynote. This will size the ListBox to fill its container.
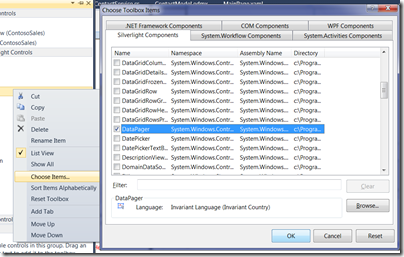 During the keynote, we had a DataPager already in place in the page, but of course we don’t have that in place ourselves. Before we’ll be able to add the DataPager to the view, we need to add DataPager into the Toolbox by right-clicking on the toolbox and selecting Choose Items.
Once you have DataPager in your Toolbox, you can drag one out of your Toolbox and into the lower-left cell in our grid. Use the Reset Layout->All gesture on this control as well.
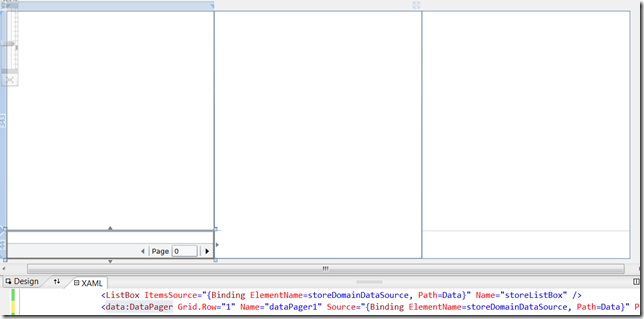
Using the Properties window, set the DataPager’s DisplayMode to PreviousNext and also set the PageSize property to 5. Then drag the Store entity out of the Data Sources window and drop it onto the DataPager. This will bind the existing DataPager control to the same collection of Stores as the ListBox we created a minute ago, thus applying server-side paging to the ListBox. You should see something like this:
Let’s now set up the next part of the master-details scenario. Expand Store in the Data Sources window and select StoreContacts. Use the dropdown to select ListBox and drag StoreContacts onto the middle cell in our grid layout. Be sure to use Reset Layout->All to have it fill its container.
We also want to expand StoreContacts, select Contact, and 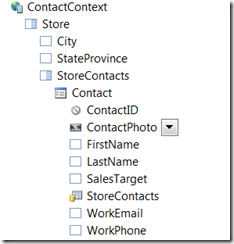 choose to have it generate Details. Before we drag this Details view onto the page though, we want to make a few adjustments to what will be generated.
- For ContactID, select [None];
- For ContactPhoto, select Customize… and then check Image and click OK;
- Then for ContactPhoto, select the Image control.
We can now drag Contact into the upper-right cell of our grid layout and reset the layout.
 In the keynote, Scott deleted the Contact Photo label and resized the Image control to fill the width of the details. If you do this too, you might encounter a bug where the image placeholder isn’t rendered correctly. This is a known bug that occurs in some scenarios. Often, zooming the view to 100% will alleviate this issue.
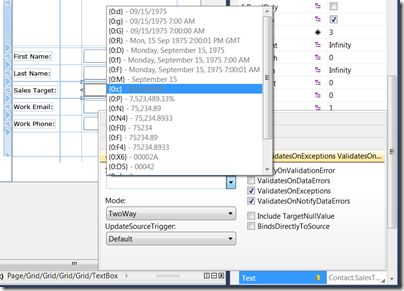
Let’s edit the Sales Target textbox using the binding picker to set the String Format for the binding, setting it to {0:c}.
We now just need to create a Save button and wire it up to submit changes. Drag a button out of the Toolbox, dropping it into the lower-right cell of the grid; change its Content to “Save” and then double-click on it to set its click handler.
There’s a known bug with the preview release that prevents IntelliSense from working at this point, until you perform a build. So just hit F6 and IntelliSense will come back.
In the click event handler, add the single line of code:
this.storeDomainDataSource.SubmitChanges();
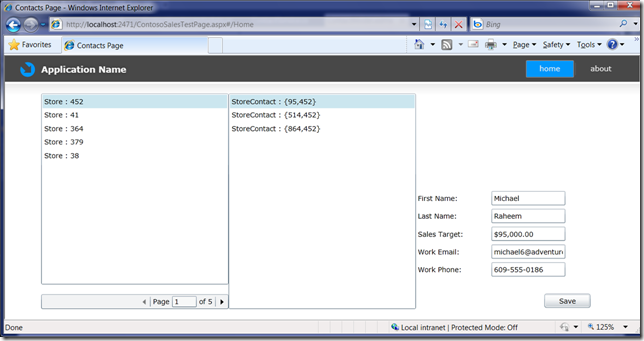
You can now run the application and it’s fully functional. You should be able to page through the records, click through the stores, store contacts, and edit the contact details, with validation wired up, and the ability to save changes. Of course, it’s not yet styled, and we don’t have any of the images in place in the web project.
Styling the Application
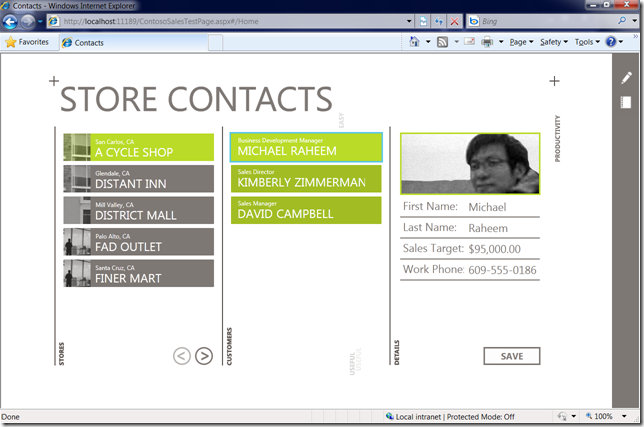
Okay, what we just build doesn’t look quite like what we saw during the keynote. That’s where having some designer-supplied XAML comes in handy! Our designer, Corrina, created the design of the application using Expression Blend and provided a customized MainPage.xaml, Styles.xaml, and she had Contacts.xaml set up with the grids arranged the way that fits into the design. Here is the finished result with the styles and everything in place:
You can download the styled version of the application here. I’ll work on follow-up posts that break down how the styles transform what we built into this end result.
When you download the styled application, be sure to:
- Right-click on the Zip file and hit Properties to Unblock it if necessary;
- Extract the zip;
- Open the solution;
- Set the Web project as your Startup Project; and
- Rebuild the solution.
Run-Down
You can see how the new tooling in Visual Studio 2010 jumpstarts application development using RIA Services and Silverlight 4.
Here’s a quick reference to the links throughout this post:
- Install Visual Studio 2010 Beta 2
- Install the Silverlight 4 Tools for Visual Studio 2010, which includes:
- Silverlight 4 Developer Runtime
- Silverlight 4 Beta SDK
- Microsoft
- WCF RIA Services
- Download the Database from ContosoSales.mdf.zip
- Download the styled application from ContosoSales.Styled.zip
- Be sure to visit http://silverlight.net/riaservices
This week has been extremely exciting for me and I hope that you enjoy building the application that you saw presented during the keynote.
