This is part 2 of a 4-part series discussing a concept that I've long called "Custom Controls Everywhere" and how ASP.NET MVC affects it. In part 1, we went through a discussion of how ASP.NET MVC took away the capability to use Custom Controls Everywhere. But in this article, we'll demonstrate a way to resurrect the concept within MVC.
Defining Our Sample, Using ASP.NET MVC
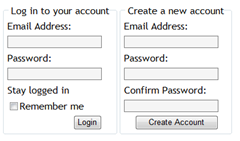 In order to properly demonstrate how Custom Controls Everywhere can be achieved within MVC, we need to set our baseline. We're going to use a pretty basic sample: a screen that offers a login form as well as an account creation form. In the login form, the user will enter an email address and password. The account creation form will also have an email address field, and 2 password fields (entry and confirmation).
We want to define some custom presentation settings for the textboxes as well as some custom behaviors. For presentation, we want all textboxes to use the CSS class of 'Form' initially. When a textbox gains focus, we want to apply an additional CSS class for 'Focus' to the control. Of course, during the control blur, we take the 'Focus' class away.
It wasn't much effort to get this up and running using MVC and the HTML helpers. But there some redundant and lengthy code. Here's a snippet; the same type of code is repeated for every textbox on the page.
1: <tr>
2: <td>Email Address:</td>
3: </tr>
4: <tr>
5: <td><%= Html.TextBox("EmailAddress", "",
6: new { _class = "Form",
7: onfocus = "this.className = 'Form Focus';",
8: onblur = "this.className = 'Form';" }) %></td>
9: </tr>
10: <tr>
11: <td>Password:</td>
12: </tr>
13: <tr>
14: <td><%= Html.Password("Password", 20, "",
15: new { _class = "Form",
16: onfocus = "this.className = 'Form Focus';",
17: onblur = "this.className = 'Form';" }) %></td>
18: </tr>
This works. We get the textboxes with the 'Form' class applied from the start, and we add the 'Focus' class while they have focus. But we have to repeat the behavior on every textbox--on this simple page, that 5 times we have the code. That's unacceptable; this is an excellent example of why we want a custom textbox control.
Custom Controls Approaches
I have tried several approaches for creating custom controls within ASP.NET MVC. Some worked, some didn't. Some of the ideas that could've worked would have required a bunch of code, and it had very bad code smell. I started off trying to simply derive from the System.Web.UI.WebControls controls, changing the behavior to work within MVC. That didn't work. Nor did deriving from the System.Web.UI.HtmlControls controls. I probably could have made either of these approaches work, but that's where the code smell started kicking in.
Josh commented on on part 1 and guessed that I was going to be using control adapters. Honestly, that hadn't crossed my mind and it seems like a good idea on the surface. But you still have to have a control to apply the adapters to, which means that we still need to derive from an existing control, and we're back to the code smell as we just talked about.
What I came up with utilizes the nice new object initializers feature in .NET 3.5 along with an overridden ToString method. I've created an abstract MvcControl class that will serve as the base control, just like System.Web.UI.Control does for web forms. Then I created an MvcTextbox class that renders out an <input type="text"> tag; this is where we add our custom functionality. Lastly, MvcPassword is derived from MvcTextbox and simply changes the type to "password."
Custom Control Usage
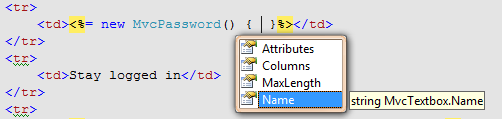
We're going to jump right past the implementation of the MvcControl, MvcTextbox, and MvcPassword, and show how the controls are used. Look how much simpler this code is compared to using the HtmlHelper extensions!
1: <tr>
2: <td>Email Address:</td>
3: </tr>
4: <tr>
5: <td><%= new MvcTextbox() { Name = "EmailAddress", MaxLength = 20 } %></td>
6: </tr>
7: <tr>
8: <td>Password:</td>
9: </tr>
10: <tr>
11: <td><%= new MvcPassword() { Name = "Password", MaxLength = 20 } %></td>
12: </tr>
Yes, seriously, it's that easy to use. It's different from how we use custom controls in traditional web forms, but that's okay. This maintains the feel of "slinging around HTML." What's great about this is that you get full intellisense on the initializer this way, rather than when you just pass in an 'object' to the HtmlHelper extensions to add additional attributes. And you don't have to guess (or remember) how to handle things like "class" where we saw above that we had to refer to it as "_class" because of the keyword conflict. The custom control can call it "CssClass" just like we're used to.
How Does It Work?
There isn't much code going on here, at least not yet. The code I have is only in proof-of-concept condition, and it's certainly not ready for prime time, but it did its job, it proved the concept. As I stated, there is an MvcControl abstract class, an MvcTextbox and an MvcPassword. Let's start with looking at the MvcControl class.
1: public abstract class MvcControl
2: {
3: private System.Web.UI.AttributeCollection attributes;
4: public System.Web.UI.AttributeCollection Attributes
5: {
6: get
7: {
8: if (attributes == null)
9: {
10: System.Web.UI.StateBag bag = new System.Web.UI.StateBag(true);
11: attributes = new System.Web.UI.AttributeCollection(bag);
12: }
13:
14: return attributes;
15: }
16: }
17:
18: private string tagName;
19: protected string TagName
20: {
21: get { return tagName; }
22: set { tagName = value; }
23: }
24:
25: protected MvcControl(string tag)
26: {
27: this.tagName = tag;
28: }
29:
30: public override string ToString()
31: {
32: System.Text.StringBuilder builder = new System.Text.StringBuilder();
33: using (System.IO.StringWriter writer = new System.IO.StringWriter(builder))
34: {
35: using (System.Web.UI.HtmlTextWriter html = new System.Web.UI.HtmlTextWriter(writer))
36: {
37: this.attributes.AddAttributes(html);
38: html.RenderBeginTag(this.tagName);
39:
40: this.RenderContents(html);
41:
42: html.RenderEndTag();
43: }
44: }
45:
46: return builder.ToString();
47: }
48:
49: protected virtual void RenderContents(System.Web.UI.HtmlTextWriter writer)
50: {
51: }
52: }
Please don't flog me for not having any comments. Like I said, it's only a proof of concept! But let's go over the key components of this control class.
- We override the ToString method, and we use an HtmlTextWriter to generate the Html tag for the control. This will be used for all controls that inherit from this abstract class, unless something decides to use custom rendering. To use custom rendering, you just override ToString again.
- In order to render our Html tag, we need 3 things: Tag Name, Attributes and Contents. We keep TagName in a property, and the same with Attributes. Contents will need to be rendered out virtually, so the derived class is responsible for that as needed.
- The constructor accepts the tagName parameter so that derived controls don't forget to set this. In real-world code, we'd probably defend against null or empty tag names, and possibly put some other defense mechanisms in, but what we have will do for now.
I would imagine if this class were really built out, it would look very similar to how the control base classes look under the System.Web.UI namespace. That's where I'm unsure how the MVC purists will react to this approach. But if we vie to keep the controls simple, and we don't wind up having the entire control hierarchy again, I think we'd be okay.
Let's take a look at the MvcTextbox now. He inherits from the MvcControl, and then adds support for the properties that we want to expose. We also implemented our custom presentation and behavior right into the control too.
1: public class MvcTextbox : MvcControl
2: {
3: public MvcTextbox()
4: : base("input")
5: {
6: this.Attributes.Add("type", "text");
7: this.Attributes.Add("class", "Form");
8: this.Attributes.Add("onfocus", "this.className = 'Form Focus';");
9: this.Attributes.Add("onblur", "this.className = 'Form';");
10: }
11:
12: public string Name
13: {
14: get { return this.Attributes["name"]; }
15: set { this.Attributes["name"] = value; }
16: }
17:
18: public int Columns
19: {
20: get { return System.Convert.ToInt32(this.Attributes["size"]); }
21: set { this.Attributes["size"] = value.ToString(); }
22: }
23:
24: public int MaxLength
25: {
26: get { return System.Convert.ToInt32(this.Attributes["maxlength"]); }
27: set { this.Attributes["maxlength"] = value.ToString(); }
28: }
As you see, the control implementation is quite simple. The properties are just stuffed into the Attributes, which makes them part of the rendering. If you need to do something more scenario-based, it would be easy to do too--just override ToString, add your custom logic to manipulate the Attributes collection, and then allow the base processing of ToString occur.
Finally, let's examine the code for MvcPassword. This one is about as simple as it gets!
1: public class MvcPassword : MvcTextbox
2: {
3: public MvcPassword()
4: : base()
5: {
6: this.Attributes.Add("type", "password");
7: }
8: }
It doesn't matter that the 'type' attribute has already been added, the AttributeCollection class takes care of this for us, replacing the value of that attribute with "password." So our MvcPassword gets all of the goodies that the MvcTextbox had, including presentation and behavior; the only difference is that it's an <input type="password"> tag instead.
Achieving Custom Controls Everywhere in MVC
With this approach of using object initializers and overriding the ToString method on control classes, we've found a way to utilize custom controls in ASP.NET MVC. To truly achieve Custom Controls Everywhere, we'd need to create classes for all controls that we need to use. With the MVC mindset of not needing a repeater control, it should be pretty easy to build out the entire suite of MVC controls needed. We don't want to implement control hierarchies, we just need small units that provide a means for implementing application-wide presentation and behavior.
Wow, cool. Now what?
There's still a lot to do here. This series won't go to the extent of building self-validating controls or anything like that though. The next article will talk about what I'd like to see from the ASP.NET MVC framework to better enable us to utilize Custom Controls Everywhere. Please continue to follow the series and show your support of the idea! Again, I welcome any feedback of any kind!
You can download the full code for this article here. You can see that the forms with custom controls can successfully be submitted and processed by controllers.